
Give an outdoor learning experience to your kids with this practical chalkboard idea. Gather your materials and follow this tutorial.
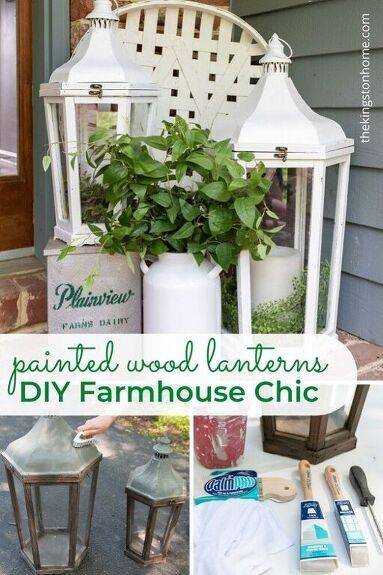
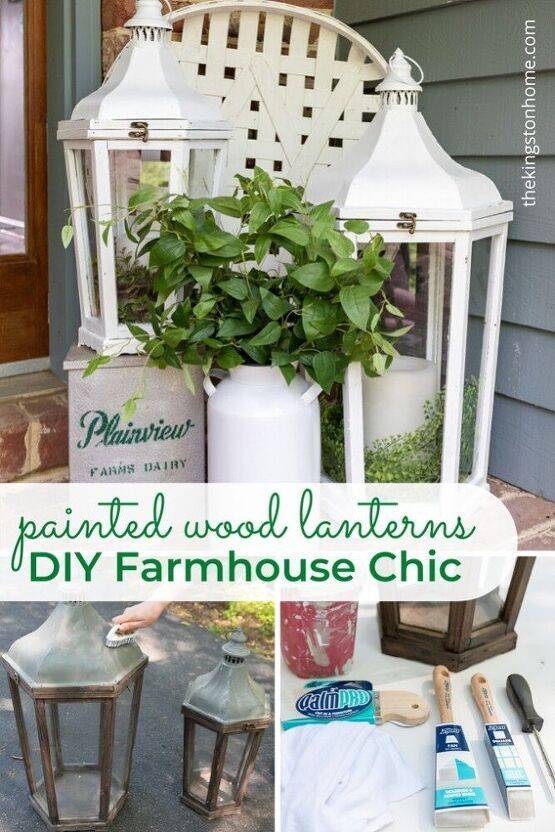
DIY Farmhouse Chic: Painted Wood Lanterns
27.06.2023 - 19:15 / hometalk.com
{Disclosure: This is a sponsored post from Zibra Brushes but the opinions and projects are mine all mine!} Calling all my bargain shoppers! Love those inexpensive wood pieces you find at mass craft stores but don’t like the color? Grab some Zibra brushes and create your own farmhouse chic home decor to brighten up any space!
I bought these giant candle lanterns on clearance last year. I wasn’t in love with the brown wood (I am a bright white and lots of color girl) but couldn’t beat the price! I justified it by telling myself I’d paint them, but every time I thought about the process of taping off the glass and getting in to the nooks and crannies and curves of these intricate lanterns I just pushed the project further down my to-do list. Until Zibra Brushes came in to my life!
In the past I have been a spray paint girl (cough cough lazy painter cough cough) so have shied away from projects like this. When you have a piece with so many angles and curves it is hard to get even coverage in some spots without over-painting others. With these Zibra brushes I was able to choose the brush I needed for the shape of each part of the lantern and it was a total game changer. Now I can’t wait to paint all the intricate things!
SUPPLIES NEEDED:
CLEAN LANTERNS
Lightly brush/clean the lantern inside and out to remove any debris. The surface was textured enough that I didn’t need to do any sanding, but if you are painting a lantern that has a super smooth surface (like metal) just give it a light scuffing with some sandpaper.
REMOVE HARDWARE
Remove hardware as desired. I wanted to paint the hinges on the back but leave the front clasps the original metal for a little pop of color so I took them off and set them aside.
PAINT LANTERN SECTIONS
The website greengrove.cc is an aggregator of news from open sources. The source is indicated at the beginning and at the end of the announcement. You can send a complaint on the news if you find it unreliable.
Top Autors
Popular Topics

gardenerspath.com
13.07.2023 / 04:57
How to Grow and Care for Painted Daisies
A painted daisy is proof that you can’t judge a book by its cover. Or rather, that you can’t judge an effective bug-killer by its beautiful blooms.We link to vendors to help you find relevant products. If

hometalk.com
09.07.2023 / 20:01
How to Make a Cute Farmhouse Pulley & Hanging Bucket Planter
Today, I am going to show you how I made a DIY farmhouse pulley and hanging bucket planter for my porch. It isn’t quite warm enough here in Michigan for real flowers to be out on my porch, so I wanted to come up with something to fill the space.

hometalk.com
06.07.2023 / 12:49
DIY Wood and Copper Climbing Trellis
I realized that my hardenbergia was not thriving because it is a climbing vine and didn’t have anything to climb! Hardenbergias produce stunning purple flowers, is native to Australia, and makes a lovely addition to any space. I decided to build a wood and copper trellis to help bring the plant back to health and to give it a structure to climb with an artful design. This wood and copper trellis was simple and inexpensive to make using leftover pine and copper pipes and adds so much visual interest to my backyard.

hometalk.com
05.07.2023 / 00:59
DIY Wood Garden Bridge
Instructions for building a wooden garden bridge.

hometalk.com
03.07.2023 / 12:15
Create The Perfect Farmhouse Table With A Painted Wood-Grain Effect
If you have a table that is bare or needs a makeover, try this painted faux wood-grain effect. It's a simple project, but the outcome is breathtaking. Here are the simple steps on how to complete this project.

hometalk.com
01.07.2023 / 16:29
How To DIY Painted Rock Flowers Garden
These colorful blooms are a pretty addition to any outdoor space — and you don’t need to worry about watering or weather!

hometalk.com
30.06.2023 / 05:09
DIY Wood Privacy Screen
In the area we live in, backyards are very small and are commonly quite close to the neighbors. Even though my yard is enclosed by a fence, I wanted a privacy screen to further separate my backyard space from my neighbor’s house that is very close to mine on the other side. This wood slat screen was the perfect way to add a bit more privacy to my yard, and the contrast of the warm wood with the metal adds a lot of style at the same time. This was a relatively simple and inexpensive DIY project to complete in a weekend to beautify and improve my outdoor living area.

hometalk.com
30.06.2023 / 05:09
How I Painted a Cement Birdbath
I bought a cement birdbath about a month ago from Walmart. I've always liked birdbaths, but have not owned one due to the cost. The ones I've seen in the past have always been over $100 and I just didn't feel like spending that kind of $$ on one. Then, when I was at Walmart one day, I thought I'd stroll through the garden statues they had in the parking lot. I asked one of the employees how much the birdbaths were and he said $24.99. $24.99????!!! I must have one! So, I bought one and brought it home. My son was visiting, so he moved it from the car to the back yard. It's pretty heavy! After I had the spot ready for it, the son came over again for a visit, so, I asked if he could move it to the new location. He carried the base, I carried the top (which was pretty heavy on its own). He set the base down and I handed him the top. He placed the top on the base, or I should say he tried to place the top on the base because it didn't fit!!! How can it not fit? Then I thought back on how it looked when I bought it and remembered that the top was slightly askew. I just figured it hadn't been set on the base evenly. Come to find out, the hole in the bottom of the basin was more oval than round.

hometalk.com
28.06.2023 / 04:43
Repurposed Headboard Bench | Farmhouse Style
Don't toss your old headboard or pass up that broken bed at the thrift store. You can easily make yourself a super cool and unique bench with a wooden headboard and foot board. Check out this quick tutorial, and find out how I transformed a $5.00 headboard and foot board pair into a beautiful farmhouse style bench.

aberdeengardening.co.uk
27.06.2023 / 08:43
Lily Tiger Woods
The Lily Tiger Woods, big, bold, colourful, reliable and a right show off.

aberdeengardening.co.uk
27.06.2023 / 08:41
Japanese painted fern Athyrium nipponicum pictum
The Japanese Painted Fern, Athyrium niponicum Pictum’. In our round garden it is an absolute treat, with soft silvery greyish-green foliage that has a hint of maroon finely etched through the fronds.