
Create this hanging feeder for squirrels, using pine cones, peanut butter, and other important supplies. You’ll get the detailed How-to at Keaton The Foodie.
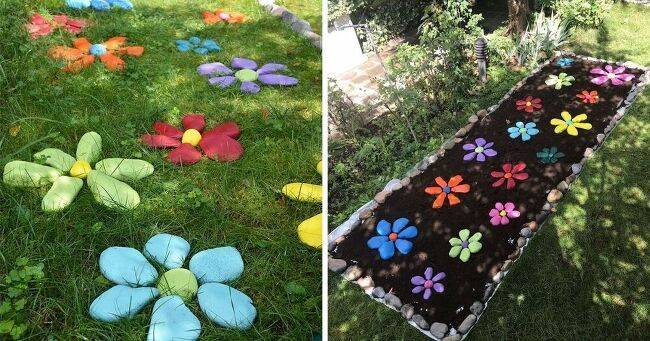
How To DIY Painted Rock Flowers Garden
01.07.2023 - 16:29 / hometalk.com
These colorful blooms are a pretty addition to any outdoor space — and you don’t need to worry about watering or weather!
I finished this easy DIY project in an afternoon with supplies I had on hand.
All you need is a few cans of spray paint (you can also use craft paint) and a few rocks. The best part?
Painting the rocks is easy-peasy; you can even get your little ones involved for a fun family activity.
If you are worried about lawn mowing see option 2 — where the garden bed could be made of mulch, dirt or pebbles.
More of my projects here: Decor Home Ideas
You can watch a video to see detailed instructions here:
Supplies:
Choose a Construction Option for Your Rock Flower Garden
1. Lay the painted rocks directly on top of your grass
2. Lay the painted rocks on a prepared garden bed For a low-maintenance option, set your painted rock flowers on a bed of pebbles, mulch, or dirt.
The arrangement is completely up to you! You might choose to make flowers with one color for the center and a different color for the petals. Alternatively, consider making rainbow flowers with petals in different colors. If you’re bringing your kids in on the fun, this is a great time to let them use their imaginations for a truly personalized rock garden..
How To Make Painted Rocks into Flowers
1. Decide how many flowers you want to create. For each one, collect 6 petal stones and 1 center stone.
2. Arrange the flowers in your driveway or yard. This step takes a little bit of time, but it’s a big help when you start to paint!
3. Gather your spray paint and prepare a painting area. Collect all of your spray paint colors and set them in a well-ventilated outdoor space.
Protect the cement or the ground by laying down a large piece of plywood. Cardboard and
The website greengrove.cc is an aggregator of news from open sources. The source is indicated at the beginning and at the end of the announcement. You can send a complaint on the news if you find it unreliable.
Top Autors
Popular Topics

balconygardenweb.com
10.07.2023 / 14:43
41 Beautiful Vertical Flower Garden Pictures
You don’t need to have a spacious yard to add a pop of color around yourself. Here are some awesome Vertical Flower Garden Pictures that will give you an idea of how to grow them while saving a lot of space!

balconygardenweb.com
03.07.2023 / 16:13
DIY Plastic Bottle Vertical Garden
Begin by cutting the plastic bottle in the middle. To cut a plastic bottle in half, you will need a sharp object such as a pair of scissors or a utility knife.

balconygardenweb.com
03.07.2023 / 12:19
10 Creative DIY Table Top Water Garden Ideas
If you ever wanted to bring a water garden indoors but stopped due to lack of space–try these tabletop water garden ideas and have these cute miniature centerpieces for decor.

hometalk.com
02.07.2023 / 18:03
DIY Concrete Rock Solar Light
There’s nothing more beautiful and welcoming than a warmly lit path, or garden. And concrete rock solar lights are perfect because during the day, the unsightly black lights are disguised.

hometalk.com
30.06.2023 / 15:35
How To Paint Outdoor Cushions
Outdoor furniture can get beat up pretty bad from being outside in the elements and pushed in and out of storage – especially cushions – they fade and get stained so quick. Even if your cushions are in great condition – styles change and patterns get dated fast! Reupholstering or replacing your cushions is SO expensive. The perfect solution to update your outdoor cushions is to paint them! Yes, you can paint your outdoor cushions and you won’t believe how comfy, durable and fabulous they look. AND it’s super quick and cheap!

hometalk.com
30.06.2023 / 05:09
How I Painted a Cement Birdbath
I bought a cement birdbath about a month ago from Walmart. I've always liked birdbaths, but have not owned one due to the cost. The ones I've seen in the past have always been over $100 and I just didn't feel like spending that kind of $$ on one. Then, when I was at Walmart one day, I thought I'd stroll through the garden statues they had in the parking lot. I asked one of the employees how much the birdbaths were and he said $24.99. $24.99????!!! I must have one! So, I bought one and brought it home. My son was visiting, so he moved it from the car to the back yard. It's pretty heavy! After I had the spot ready for it, the son came over again for a visit, so, I asked if he could move it to the new location. He carried the base, I carried the top (which was pretty heavy on its own). He set the base down and I handed him the top. He placed the top on the base, or I should say he tried to place the top on the base because it didn't fit!!! How can it not fit? Then I thought back on how it looked when I bought it and remembered that the top was slightly askew. I just figured it hadn't been set on the base evenly. Come to find out, the hole in the bottom of the basin was more oval than round.

houseandgarden.co.uk
28.06.2023 / 20:13
How to design a white garden | House & Garden
A garden with a restrained planting palette can be so exciting and atmospheric. Nowhere is this more true than in the case of the white garden. The limitations of choosing plants of a single colour means you can focus your attention; in fact there are so many plants out there that if you don’t have some sort of guiding principles when you set about designing your garden, you will soon be lost and overwhelmed with options.

hometalk.com
26.06.2023 / 08:41
How to Paint Flower Pots for the Porch
It is time for planting our pretty flowers and I want to show you how to paint flower pots for your porch! There are so many ways to paint your flower pots but I had some leftover product from my Roman Clay Faux Finish in Black so I used it to coat my terra cotta pots and it is stunning!

balconygardenweb.com
23.06.2023 / 22:47
7 Unusual DIY Clock Ideas For Garden
Make this faux garden clock on a round tabletop or wood cut into a circular shape. Hang it in your home or outdoor sitting area for decoration. Check out the tutorial here.

hometalk.com
23.06.2023 / 17:03
Revamp an Old Patio Umbrella With This DIY Painted Umbrella Makeover
Often, household items past their prime end up in landfills and trash bins. This doesn’t have to be the case! I had a very old faded sun umbrella that was headed for the trash. While it was quite old, it was still in great shape, so I decided to spruce it up a bit for the summer! With a bit of paint, I was able to not only save this umbrella from the trash, I was also able to take it to the next level and brighten up my garden. Even better, this project only takes a bit of time and money to complete. Want to see how I did it? Follow my step-by-step tutorial below!

hometalk.com
23.06.2023 / 12:46
How to Paint Wicker and A Wicker Chair Makeover
*Disclaimer: This post was sponsored by Colorshot, however, all options are my own.