
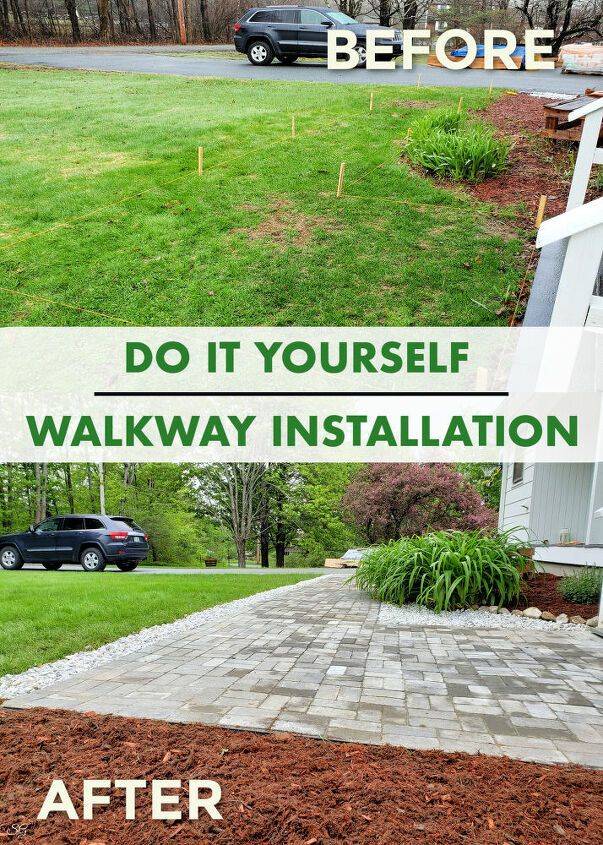
DIY stamped concrete pavers are an easy way to improve your outdoor space, and for cheap!
DIY Paver Walkway
25.06.2023 - 12:17 / hometalk.com
We ran into some issues while we were creating a paver walkway for the front of our house. Luckily, we found an awesome new product that saved us a hassle, and a headache!
Click here to see our walkway project!
What you'll need
Step 1
Prepare the ground. For us this meant digging out the grass. We strung mason lines around the area where we were going to put our walkway. Then we dug out the ground.
----
Remember that issue I said we had? Well, apparently there was an old field stone walkway about 4 inches under the grass from when the house was originally built.
Normally you'd dig down 6-10 inches and fill with a hardpack material for a sturdy base.
However, we found a product called «Paver Base». These are poly panels that replace the need for the huge amount of hardpack. And it worked amazing!
There they are. These two boxes replaced literally TONS of hardpack material, and loads of labor on our part!
Step 2
Compact the ground with a hand tamper or a vibrating plate compactor.
Note: The hand tamper is very labor intensive. Probably the hardest part of the entire project is tamping everything down.
Step 3
Roll out layers of weed blocker. This is when, of course, the wind will decide to start blowing like mad. Right? That's why you see so many wrinkle.
Nevertheless, the weed block material is not there to prevent weeds, but prevents the layer of sand from seeping into the dirt below.
Step 4
Add a 1/2 inch layer of sand over the weed block. Use your screed poles and straight board to get the half inch layer built up.
Then tamp it down with your hand tamper.
Step 5
Lay out the paver base material over the sand.
These paver base panels interlock and went down really easy. Unbelievably easy!
At first, I was totally unsure if they were going to
The website greengrove.cc is an aggregator of news from open sources. The source is indicated at the beginning and at the end of the announcement. You can send a complaint on the news if you find it unreliable.
Top Autors
Popular Topics

hometalk.com
14.07.2023 / 10:17
Adding Brick Pavers to the Garden Area
We recycled old bricks to create a mud-free entrance between our garden and our garden shed.

balconygardenweb.com
13.07.2023 / 17:49
11 DIY Air Plant Wreath Ideas
Secure air plants onto a metal macrame ring with the support of some filler greens and jewelry wire. The idea is available at Clever Bloom.

hometalk.com
10.07.2023 / 12:55
How We Made a Simple DIY Walkway For Our Cute Bicycle Mailbox
Well, it's been a few years and our DIY bicycle mailbox was ready for a makeover. This time around we added a DIY walkway under it to avoid having to weed whack around it. So this tutorial is mainly explaining how we put a walkway under it.

hometalk.com
08.07.2023 / 17:47
Beautiful DIY Live Edge Oak Table
I love creating pieces from cuts of wood with live edges. When my grandfather gave me a piece of oak wood with a stunning live edge, I knew I couldn’t use it for just any old piece of furniture, so it sat in my shed for about ten years. Then inspiration hit, and I knew what I wanted to make with it. Come along and I’ll show you how I made an oak table with a live edge and iron legs.

hometalk.com
08.07.2023 / 05:46
How To Make Mosaic Rock Pavers!
This is a super fun and easy way to create unique pavers for sidewalks and pathways. I'm currently working on a pathway around my house and wanted something heavier and more decorative than the pavers available at the outdoor center, so I decided to make my own!

hometalk.com
04.07.2023 / 09:19
Quick Spray-on Rust DIY!
For this tutorial, I'm excited to show you another way to rust metal! This method is great for large steel/metal objects that you cannot soak (see my other metal rusting tutorial for smaller items). I used it forthese AWESOME steel planter boxes from DIYCartel. They come in raw steel and are gorgeous as is… but you know me… I like everything rusted to perfection! Here's a picture of the «after», so you can see what I mean!

hometalk.com
30.06.2023 / 15:35
DIY Succulent Table: Step-By-Step Instructions to Do It Yourself
Designer piece instead of simple furniture — we explain how to turn a normal table and a few succulents into an amazing eye-catcher.
 $100 Walkway Update - hometalk.com")
hometalk.com
28.06.2023 / 09:29
Our (About) $100 Walkway Update
Do you ever have those little projects in your landscape where what you have just isn't working for you? Yeah, us too and here it was!

hometalk.com
27.06.2023 / 19:15
DIY Installation of Paver Base Panel for Paver Path - Part Two
DIY Installation of Paver Base Panel for Paver Path — Part Two ~ Take your garden to the next level… install a garden paver path so you can enjoy your garden anytime! — Paver Base Panel DIY Homeowner installation of Garden Paver Path Walkway – Landscaper Know How — Paver base panels make it easier for homeowners to acheive proffesional results when installing paver walks or patios. The paver base panel replaces six inches of compacted aggregate base material saving you great amounts of hard labor! Less excavation and not have to install TONS of gravel make it a welcome choice for homeowners to install themselves. Make sure to watch the video include as it takes you step by step through the paver base panel installation all the way to the the paver installation. Part One showed how to set elevations for the final grade and excavation and sub-base and base preparations. Thank you for checking the project out and by all means share with your friends! Make sure to save the project for future reference. ENJOY!!

hometalk.com
26.06.2023 / 20:27
How We Made Stepping Stone Walkway From Ice Cream Buckets.
We had already purchased molds from Lowe`s that made this pattern. We are using this pattern that will come off the back porch and out to our sitting area with burn pit and adding two hammock chairs. We did not want everything to be matched, so we had to figure what kind of pattern we wanted. My hubby is building A bigger shop, that is why everything is in the yard. In the process of cleaning out the old shed we had A lot of empty ice cream buckets and knew someday we would use them for something.

homesthetics.net
26.06.2023 / 13:53
4 Best Paver Sealers For A Wet Look Of Epic Proportions
Paver Sealers help protect beautiful indoor and outdoor paver surfaces. With a diverse range of options available in the market, how do you pick the best sealer?